Resolving 'No Such Module' Error in in Xcode 15 on Apple M1
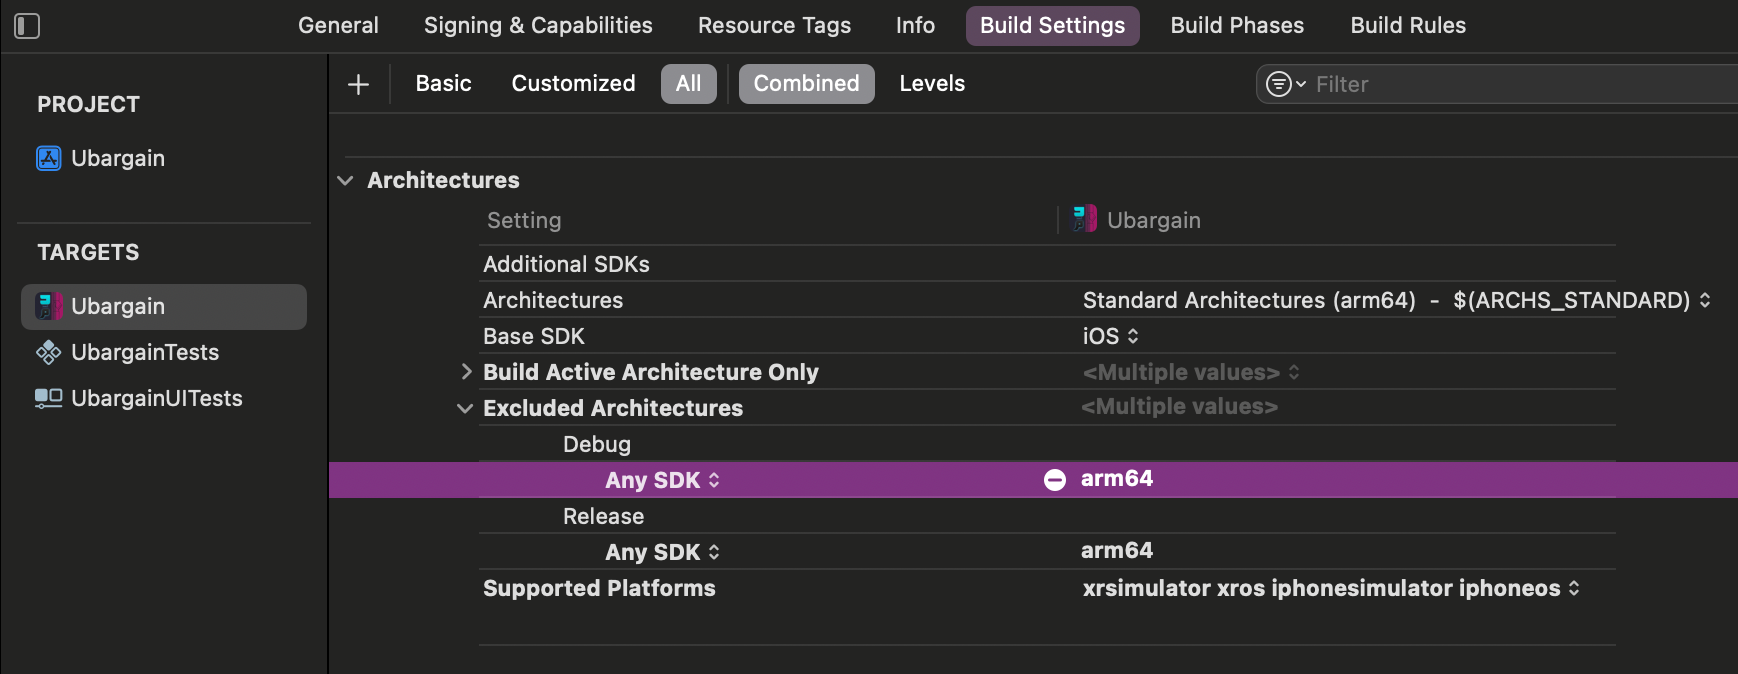
Problem: In my Xcode 13.1, Xcode 14.2, Xcode 12.4 and Xcode 15, I'm encountering a persistent issue where I can no longer build my projects. Every time I attempt to do so, I receive a "No such module..." error for each Pod used in the project. I want to emphasize that I haven't made any other changes to the project that might have triggered this issue. In an attempt to resolve this problem, I've taken several steps, including cleaning the project, deleting Derived Data, restarting my computer, removing and reinstalling the Pods, updating Cocoapods, and even adding "arm64" to the excluded architectures.
Another noteworthy aspect of this issue is that I can run the project on my physical device successfully, but it fails to build and run on the simulator.
Solution: This issue can be quite frustrating, but there are a few steps you can take to troubleshoot and potentially resolve it:
Add this to podfile and install pods again
post_install do |installer|
      installer.pods_project.build_configurations.each do |config|
        config.build_settings["EXCLUDED_ARCHS[sdk=iphonesimulator*]"] = "arm64"
      end
end

pod install-
Check Podfile and Podfile.lock: Ensure that your Podfile and Podfile.lock are correctly configured and up to date. You can do this by running
pod installto ensure that your Pods are correctly linked. -
Xcode Workspace: Make sure you're opening the
.xcworkspacefile instead of the.xcodeprojfile when working with CocoaPods. This workspace file includes references to your Pods. -
Excluded Architectures: If you added "arm64" to excluded architectures and it's causing issues, try removing it. It may not be necessary.
-
CocoaPods Version: Make sure you're using a compatible version of CocoaPods with Xcode 12.4. You can update CocoaPods using
gem update cocoapods. -
Clean Build: In Xcode, try cleaning the build folder (Shift + Command + K) and rebuilding the project.
-
Simulator Issue: If the issue persists on the simulator, try resetting the simulator content and settings (Simulator > Reset Content and Settings).
-
Xcode Cache: Sometimes Xcode's caches can cause issues. Try cleaning the Xcode cache by deleting the contents of the
~/Library/Developer/Xcode/DerivedDatadirectory. -
Check Xcode Schemes: Ensure that your project's schemes are correctly configured for the simulator and device. You can do this by going to Product > Scheme > Edit Scheme.
-
Reinstall Xcode: If none of the above solutions work, you might consider reinstalling Xcode and ensuring you have the latest version that's compatible with your macOS and M1 chip.
-
In my case, the solution that worked involved adding "arm64" to the Excluded Architectures in the target's Build Settings. This tweak is particularly relevant for Macs powered by the new M1 chip.
Another effective approach is to remove "arm64" from the Excluded Architectures setting. Here's a step-by-step guide for Mac users with the M1 chip:
- Open Finder and navigate to Applications.
- Right-click on XCode and select "Get Info."
- In the info window, check the box for "Open with Rosetta."
- Completely close XCode and then reopen it.
It's worth noting that Xcode 15 might have automatically incorporated this setting to enable simulators to function seamlessly on Apple silicon M1 machines, especially in projects with CocoaPods dependencies.
Furthermore, while troubleshooting, I encountered various issues that were successfully resolved through a "pod update" rather than a "pod install." This approach proved instrumental in addressing other unforeseen challenges within the project.
By adding these keywords and providing an in-depth explanation, we aim to offer a comprehensive solution and insight for users encountering similar problems on Macs with the M1 chip when working with Xcode and CocoaPods.
Remember to back up your project and important data before making major changes, especially when reinstalling Xcode. These steps should help you identify and resolve the "No such module..." error in Xcode on an Apple M1 device.


Join the conversation